Friday, February 29, 2008

Quiet View of Harvard Archway


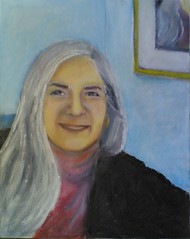
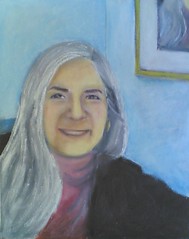
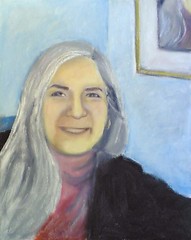
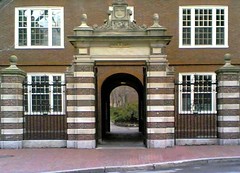
Quiet View of Harvard Archway Originally uploaded by randubnick

Today some good friends from Chicago were visiting Boston and we got together in Cambridge. Back in Chicago, a couple of decades back, we were next door neighbors. It was great to see them today! We had lunch in Cambridge and then hit the bookstores. As we were leaving the Harvard Bookstore, my friends were admiring this building, directly opposite. I remembered a photo of it that I took a couple of years ago (December 2006), and I found that photo tonight. I had also cropped a view of the archway out of that image and posted it here. I hadn't used the rest of the photo because of a big black trash can that was ruining the composition. But I really liked the original photo, so I decided to see what I could do to solve the problem. I opened the photo in Painter IX and used a little cut and paste, as well as digital airbrush, to make the trash can disappear. Now there is a clear view of the building's patterns and the archway leading to Harvard Yard.

Thursday, February 28, 2008

Chain Link Fence with Snow (Digital Woodcut)


Chain Link Fence with Snow (Digital Woodcut) Originally uploaded by randubnick

This image is not from a recent snowstorm, although it could be. (Here north of Boston, we have had run of snowstorms this month.) I created this digital woodcut today, but I made it from a photograph that I took back in December of 2005 with my first phonecam. I have been learning to make digital woodcuts using Painter IX, and I thought that some of the low-resolution images from my old phonecam might work well. Usually we pay little attention to a chain link fence, but the snow makes us look and helps us to see patterns. Woodcuts emphasize patterns, so I thought this would be a good choice. I opened the photo in Painter IX and fiddled around with the controls for a woodcut effect. It took several attempts to get this version and I had to limit the number of colors to five or six in order to get a nice white highlights for the snow. I like this version because it shows off the geometry of the fence and the brightness of the snow. Art helps us to see beauty in things that we look at (or look past) everyday.

Wednesday, February 27, 2008

Boston Taxi with Clock Tower (Posterized)

Boston Taxi with Clock Tower (Posterized Photo) Originally uploaded by randubnick

Two days ago I posted the original version of this image, a photo that I took in Boston in mid-January using my new digital camera. Yesterday I posted a digital woodcut of the same image, made in Painter IX. Today's post is the third and last version, a posterized photo also done in Painter IX. I wanted a chance to compare the effects of posterizing with digital woodcut, so I tried doing both with this photo. As with the woodcut version, I had to keep the effect fairly subtle or I lost the white color of the taxi in the foreground.

Tuesday, February 26, 2008

Boston Taxi With Clock Tower (Digital Woodcut)

Boston Taxi with Clock Tower (Digital Woodcut) Originally uploaded by randubnick

This is a digital woodcut made from the photo I posted yesterday. (I took this photo in Boston back in January with my new digital camera.) I am getting a lot more clarity with new camera. I was curious to see how much of the detail would show up in a digital woodcut. I opened the image in Painter IX and fiddled about with the options available. After a lot of trial and error, I arrived at this result. This digital woodcut was created using only colors that were already in the photograph. The effect is subtle; this looks a lot like the original photo but the black lines throughout seem to add a common thread to the disparate elements of the image.

Monday, February 25, 2008

Boston Taxi with Clock Tower

Boston Taxi with Clock Tower (Originally uploaded by randubnick)

Here is one more photo from my mid-January trip into Boston. I was trying out my new digital camera along the way, from the passenger seat. I noticed the clock tower, a Boston icon, and I am always trying for a good picture of it, so I gave it another try. When I began to work with this image on the computer, I didn't like the fact that I didn't get a good view of the clock tower with all the stuff going on in the foreground: advertisements on a Boston Licensed Taxi, street signs, a box for the Boston Phoenix. But I also kind of liked all that stuff in the foreground, which is actually just Boston, so I cropped the photo to get this composition.

Sunday, February 24, 2008

John Hancock from Memorial Drive (Digital Woodcut)

John Hancock From Memorial Drive (Digital Woodcut) Originally uploaded by randubnick

This image began as one of the photos I took during a mid-January excursion into Boston and Cambridge. I was trying out my new digital camera that day, trying to see if I could get clear pictures from a moving car (passenger seat only!), because I often take pictures that way! This was the view from Memorial Drive, which runs along the Charles River on the Cambridge side; I glimpsed the John Hancock Building (over on the Boston side), so I took a quick picture. I recently edited the photos I took that day, and in fact, this is the first one I edited. The original photo was problematic because the building kept getting lost behind the trees. I opened Painter IX to try posterizing the image, but that didn't really do the trick. I decided to try digital woodcut, and found that when I adjusted the "heaviness" control, I liked the effect. So here it is. . . .

Saturday, February 23, 2008

Zakim Bridge and Clear Blue Sky (Digital Woodcut CS)

Zakim Bridge and Clear Blue Sky (Digital Woodcut CS) Originally uploaded by randubnick

This is another digital woodcut, created from the same photo of Boston's Zakim Bridge. (See posts from the past two days.) I also made this image in Painter IX, but this time I used a color set. I think I like this one the best of the three.

Friday, February 22, 2008

Zakim Bridge and Clear Blue Sky (Digital Woodcut)

Zakim Bridge and Clear Blue Sky (Digital Woodcut) Originally uploaded by randubnick

This is a digital woodcut made from the photo that I posted yesterday. I have had the Painter program for a long time, but only recently have started using it to make digital woodcuts. Today I worked with some of the photos from a mid-January drive into Boston. I thought the Zakim Bridge would make a nice woodcut because of its beautiful patterns. I adjusted the heaviness and black line controls till I had the effect I wanted.

Thursday, February 21, 2008

Zakim Bridge and Clear Blue Sky (Digitally Modified Photo)

Zakim Bridge and Clear Blue Sky (Digitally Modified Photo) Originally uploaded by randubnick

This image began as a photo that I took on January 14. I was in the passenger seat on the way home from Boston. I wanted to see if I could get a photo of the Zakim Bridge with my new digital camera. It is certainly easier and faster to whip out my phonecam than to get my digital camera ready to shoot, but I could immediately see that the digital camera does a better job in terms of clarity. But what I didn't see while I was taking the picture was a fluffly white cloud behind the tower, in the worst possible position for the composition. So tonight I opened the image in Painter IX and blew the clouds away with digital airbrush. Then I cropped the image to focus on the diagonal lines of the bridge.

Wednesday, February 20, 2008

Shadows at Sunset

Shadows at Sunset (Originally uploaded by randubnick)

This is a photo that I took a few weeks ago (February 2nd, to be exact), but I hadn't had a chance to do anything with it. Tonight I came across the photo again and decided to post it. This is a photo of a spot I pass quite often, almost daily, but this time, I stopped in my tracks! The light was beautiful, and I loved the shadows cast by the trees. Although I was in a hurry (as usual), I took a quick picture with my phonecam. Tonight I finally got around to editing the image, and it didn't need much, just basic rotating, cropping, and tweaking the contrast just a bit. This photo is really the result of a quick decision to stop rushing for a second, and just look.

Tuesday, February 19, 2008

Self-Portrait With Self-Portrait (Oil Bar Painting Day 7)

Self-Portrait With Self-Portrait (Oil Bar Painting Day 7) Originally uploaded by randubnick

This morning I went to the studio to work on my self-portrait. My goal was to change the position of the mouth and chin, moving both up by about a quarter of an inch. I took along the printout of the changes I made yesterday in my little digital dress-reheasal. I brought it along less as a reference than as an object lesson in what not to do. (See yesterday's post.) Today, I started by turning the painting upside-down to redraw the lines of the mouth. (Sometimes it really helps to do that!) Yesterday I lost the line of the bottom lip, so today I painted in a new outline for the bottom lip without covering up the original line, and then did the same for the upper lip. This allowed me to keep the shape of the mouth and the basic expression, so things went a lot better than they did yesterday on the computer. However, getting the details of the mouth right was a struggle today. Then I moved the chin line up, using the same approach as with the mouth. I also moved the line of the shoulder and arm up by a quarter inch. Well, I was surprised, pleased, and extremely relieved that I had not created a disaster by making these changes! (I think I learned from yesterday's struggles.) Even though the mouth is a little different here than in the prior version of the painting, this is pretty much the expression I wanted. There may still be things I will want to change, but at the moment I am feeling at peace about this self-portrait. . . .

Monday, February 18, 2008

Self-Portrait With Self-Portrait 6 With Digital Overlay

Self-Portrait With Self-Portrait 6 With Digital Overlay Originally uploaded by randubnick

Today I fought the urge to run over to the studio and repaint the mouth and chin on my self-portrait. Instead, I decided to try the changes out digitally first. I used the photo of the most recent version of the painting, opened it in Painter IX, and then drew the changes in with digital pastel. I moved both the mouth and chin up by a small amount. That sounds simple, but this took a lot of trial and error and many tiny changes to get this far. It was painstaking and frustrating work. When I was almost done, I had the before and after images on the computer screen and was switching between the two to see which I liked better. This produced the effect of basic animation, like a flip book, and it looked like the mouth was moving. This made me laugh out loud, and reminded me not to take this project too seriously. Well, I think this version is now closer to the proportions of my face, though the smile still needs a little something. (So now I am back what John Singer Sargent said about a portrait being a painting in which there is something not quite right about the mouth.) I am very glad I did my little digital dress rehearsal, because I learned a lot. It is much easier to manage trial and error with digital pastel; there is no "undo" button with oil bars! The next step will be to try to make these same changes in the studio on the canvas. To be continued. . . .

Sunday, February 17, 2008

Self-Portrait With Self-Portrait (Oil Bar Painting Day 6)

Self-Portrait With Self-Portrait (Oil Bar Painting Day 6) Originally uploaded by randubnick

This is an oil bar painting in progress. On Friday morning, I went to the studio to work on my self-portrait to make the same changes on canvas that I had made digitally the day before. (See yesterday's post.) I took along a printout of version with digital overlay. I really limited myself to making just those same few changes on the canvas, making the nose shorter and narrower (by less than a quarter inch), which put the cheek muscle in the right place. I also added more light to the corner of the eye on the left. I didn't make any more major changes to the face on Friday apart from adding a little bit of shading to the left side of the face, and then I let it be, although there are more changes to come. I didn't want to change too many things at once in the face, because if I lose the likeness, it will be harder to know what to do to get it back, so I am taking things one step at a time. But I did straighten out the lines on the wall in the background. The next step will be to move the mouth and chin up slightly (again by about a quarter inch) to get the face slightly rounder, and then even out the skin tones where I have made changes. To be continued. . . .

Saturday, February 16, 2008

Self-Portrait With Self-Portrait 5 With Digital Overlay

Self-Portrait With Self-Portrait 5 With Digital Overlay (Originally uploaded by randubnick)

I last posted my self-portrait on February 7. At that point, I could recognize myself in the painting, but wanted to let the project rest for a bit, so I didn't work on it for a week. During that time, I listened to reactions of people who know me. Some people thought it really looked like me, and some people said it was very close, but not quite. . . . After a lot of listening and looking, I concluded that my face is just a bit shorter and rounder than in the painting and this was throwing the facial proportions off a little, but enough to matter. It is frightening to change a portrait at this stage (even if I am the only client!), so I decided to try the changes out digitally before I touched the actual canvas. So I opened a photo of the portrait as of day 5 in Painter IX, and then drew the changes in with digital pastel. I shortened the nose by just a tiny bit, and also made it just a bit narrower. These changes allowed me to get the left-hand cheek muscle into the correct position. Then I put a touch of white into the corner of the left eye. With those few changes, the likeness immediately looked stronger to me. I decided to just change this much, and later deal with changes to the position of mouth and chin which would inevitably follow. On canvas, these are very small changes (less than a quarter of an inch), but still scary because you can lose the likeness in the process. But small changes are important in a portrait, and I am doing this to learn. Still, I was afraid to ruin what I already had. But I resolved to try. I printed out a copy of this image to use as a guide in the studio the next day when I made the same adjustments on the canvas. In art, as in life, small changes sometimes take courage. To be continued. . . .

Friday, February 15, 2008

February Bouquet (Posterized Photo)


February Bouquet (Posterized Photo) Originally uploaded by randubnick

Time for one last look at my February bouquet. This image began with one of the photos I took last week when my flowers arrived. I liked this shot because of the light and the composition, so I posterized it. Tonight when I was getting ready to post this image, I noticed some distractions in the bouquet and in the background, so I opened the image in Painter IX and used a little cut and paste as well as digital pastel to cover them up. This bouquet was a sweet surprise, and I am glad I have a nice photo of it.

Thursday, February 14, 2008

Roses (Digital Woodcut)


Roses (Digital Woodcut) Originally uploaded by randubnick

Yesterday at the grocery store I noticed bunches of roses (with baby's breath), bouquets for February 14th. I loved the shapes and colors, so I took a couple of quick pictures with my trusty phonecam. Last night I cropped one of the photos to get this composition, and then opened it in Painter IX, thinking I would posterize it. But instead, I decided to try making a digital woodcut from the image. I adjusted the settings to get the amount of black line that I wanted. I wouldn't normally think of roses for a woodcut, but it does emphasize the shapes of the petals. I decided this would be a good image to post today. There is no such thing as too many roses, and no such thing as too much love in the world.

Wednesday, February 13, 2008

Winter Road at Sunset (Posterized Photo)


Winter Road at Sunset (Posterized Photo) Originally uploaded by randubnick

This completes the run of four photos of the winter sunset, all taken on January 16th with my new digital camera. (These photos may not be in chronological order, but I wanted to begin and end with an image of a road.) Like the others in the set, I took this photo from the passenger seat of a car, during a ride from Beverly to Manchester, New Hampshire. So I had to crop the original photo to remove the view of the car's interior, dash, and mirrors. Then I opened the image in Painter IX and posterized it, as I did with the others.

Tuesday, February 12, 2008

Winter Scene at Sunset (Posterized Photo)

Winter Scene at Sunset (Posterized Photo) Originally uploaded by randubnick

This is the third in a set of four photos of the winter sunset. These images began as photos that I took on January 15 with my recently acquired digital camera. The vantage point is the passenger seat of a moving car, on the way to New Hampshire, and the subject was the amazing sky! I cropped this image out of one of the photos taken on Route 128, and was able to eliminate a few billboards and road signs that would have identified it as deepest suburbia (which it is!). Then I opened the image in Painter IX, and posterized it, and what remains is a quiet scene: snow and houses with lights just coming on as the winter sun goes down.

Monday, February 11, 2008

Winter Drive at Sunset (Posterized Photo)

Winter Drive at Sunset (Posterized Photo) Originally uploaded by randubnick

Here is another image that began with the photos I took January 15th with my new digital camera. This is another view of the sunset seen from Route 128 in Massachusetts, the second in a series of four images. In fact, I cropped this image from the same photo that was the basis of yesterday's post. But in this view, I cropped out the main highway, and concentrated all the attention on the road on the left side of the image. I did not crop out the lone car in the picture because I thought it added something to the composition. (I was impressed with how much I can crop with my new digital camera and still get a very clear image, clearer than with my phonecam. But I still love my phonecam and there is nothing better for spontaneity.) As with yesterday's post, I used Painter IX to posterize the image just a little bit.

Sunday, February 10, 2008

Winter Sundown (Posterized Photo)


Winter Sundown (Posterized Photo) Originally uploaded by randubnick

I have had a new digital camera for over a month now, and I recently and belatedly transferred a batch of images from the camera into the computer. I have been editing them today. This image began as one of the first few photos that I took. This was on January 15, on Route 128 near Danvers, Massachusetts, on the way to New Hampshire. It was around 4:30 which is when the sun starts to set in mid-January, up here north of Boston. The sky was amazing so I decided to take some photos. One test of a good camera for me is how well it does at taking pictures from a moving car, which is something I often do (only when I am a passenger!). I took several pictures within few minutes, and this is the first one of them. Tonight I cropped this image out of the original photo to eliminate the interior of the car. But I left in the highway and the cars. I like the juxtaposition of the lyrical sunset with the view of the freeway. This is how most of us see the scenery these days. Ever since I was a kid, I have liked the look of car lights, especially bright red brake lights, and in this case, I think they add to the composition. I decided to try posterizing the image just a bit, so I opened it in Painter IX. I liked the result, and here it is.

Saturday, February 09, 2008

Early Morning in Winter (Posterized Photo)

Early Morning in Winter (Posterized Photo) Originally uploaded by randubnick

I have had a new digital camera for a little over a month now. I have been trying it out when I get the chance, and am slowly getting used to it. I recently tranferred a batch of photos from the camera into my computer, and today I edited some of them. This image began as a photo that I took with my new camera back in mid-January, very early one winter morning. I was attracted by the snowy branches against the pinks and yellows of the January sunrise. Tonight I cropped the image, then opened it in Painter and posterized it. The color of the sky was washed out to white near the top edge of the photo, so I used a gentle color overlay to restore it.

Friday, February 08, 2008

Closeup of February Bouquet (Posterized Photo)

Closeup of February Bouquet (Posterized Photo) Originally uploaded by randubnick

The other day, this February bouquet took me by surprise when it arrived in my driveway, pretending to be a piece of mail that someone was coming over to drop off! I love the amazing selection of flowers: rose-hips, purple tulips, cream-colored roses, big bright zinnias, and tiny dahlias. Of course, I took some pictures with my phonecam right away. Today I had a chance to edit the photos. I liked the basic composition of this closeup, but in my excitement, I didn't realize that I had inadvertently captured a corner of someone's cellphone or flashdrive or whatever that was on the table. So today I opened the image in Painter IX and did a little cleanup with digital pastel. I also added just a bit of detail to the center of each of the roses, because it was hard to see the outline of the inner petals. (I just enlarged the shapes that were already there, making them easier to see.) Then I posterized the image, and here it is.

Thursday, February 07, 2008

Self-Portrait With Self-Portrait (Oil Bar Painting Day 5)


Self-Portrait With Self-Portrait (Oil Bar Painting Day 5) Originally uploaded by randubnick

Yesterday, I couldn't get to the studio, so I did some prep work on the computer in the form of digital overlays to try to resolve the likeness. The result was not successful visually (see yesterday's post), but the effort was helpful conceptually nonetheless. This morning, I printed out the photo of this portrait as of the last painting session, made just a few marks on it with a pen, and headed for the studio knowing exactly what I needed to do. As I left the house, I announced to anyone who would listen that I was only going to make five marks on the canvas. When I got to the studio, I really did limit myself to the handful of small changes I had decided upon: I modified the arch of both eyebrows, raised one eyebrow a bit, and re-drew the eye shape. Then I added a shadow to the bridge of the nose. And that was it. I had the expression I wanted. The smile in the portrait is more relaxed than in the reference photo, so it looks different. But I can recognize myself in the portrait, so I am happier with the likeness. I decided to stop there and not do anything else to the face today, apart from adding a little pink to the skin tones. Instead, I worked on the background, just trying to clean it up and make it neat. I also made a few small changes in the picture within the frame on the wall behind me, which is also the self-portrait, or a corner of it. Right now I am happy with the painting, but as always I know it is likely that I will see things I want to change. But for now, I am going to let it be. I am going to take time to decide whether to add more detail to give the painting a more polished look, or leave it as it is. Something about the unfinished look of this painting appeals to me; and it is a good reminder that this self-portrait is still a work in progress, as is the artist who painted it.

Wednesday, February 06, 2008

Self-Portrait With Self-Portrait 4 with digital overlay

Self-Portrait With Self-Portrait 4 With Digital Overlay (Originally posted by randubnick)

I knew today would be too hectic to get to the studio, so I decided to do some prep work on my self-portrait using the computer. I took the photo of the portrait as it looked on day 4 (posted yesterday) and opened the image in Painter IX. I copied the portrait and then drew over the digital copy of it using Painter's digital pastel. I wanted to work on the eyes, trying to get the expression I wanted. I also need make adjustments to get the nose into the right perspective for a three-quarter view, and wanted to sketch the changes digitally ahead of time before tackling the problem in oil bars. Although I am not entirely happy with the result here, I am glad I did this exercise. After changing the eye shape and position several times, I discovered that one of the problems was an out of place eyebrow. So that is good. I had less trouble with the nose. I ended up making so many changes that in the end it was confusing, but I did get closer to the expression I am looking for. In any case, it was a good exercise in looking, and that always helps, even if the payoff is not immediate. Tomorrow should be less crazy, and I plan to get up to the studio to work on the actual portrait with actual paint. To be continued. . . .

Tuesday, February 05, 2008

Self-Portrait With Self-Portrait (Oil Bar Painting Day 4)

Self-Portrait With Self-Portrait (Oil Bar Painting Day 4) Originally uploaded by randubnick

Yesterday I went to the studio to work on my self-portrait, and here is how it looked at the end of the session. I took along my printout of the digital overlay (posted yesterday), and tried to make the same changes with oil bar on canvas that I had made with a cursor and digital pastel. I am struggling with the oil bars in every way, and nothing is easy, but I am learning. Yesterday I changed the position of the eyes and eyebrows, trying to account for the three-quarter view and the asymmetry of my face. Right now this portrait shows a bit too much asymmetry in the eyes, and I will try to fix that next time. I spent most of the time on the eyes, and I did a little bit with shadows around the nose. I was packing up to go home when I remembered that I forgot to change the lines of the hair (to show that the head is tilted) so I did that quickly at the last minute. The portrait looks a lot better to me than it did on day 3, but there is still more to do. At this point, I have a better likeness in the digital overlay than in the actual painting (which is VERY frustrating, let me tell you), but I will keep going. To be continued. . . .

Monday, February 04, 2008

Self-Portrait With Self-Portrait 3 With Digital Overlay

Self-Portrait With Self-Portrait 3 With Digital Overlay (Originally uploaded by randubnick)

On Friday, I managed to get my portrait back on track, at least in terms of the placement of facial features. I was happier with the painting, but it still wasn't a likeness, so I needed to work on that. In addition, I needed to work on the perspective and position of the head. In the reference photo, I am not looking at the camera straight on. My head is tilted and in a three-quarter view. To make things even more complicated, my face is not symmetrical (and here I am talking about more than just the average asymmetry found in most faces). I decided to try out these changes on the computer, using a digital overlay instead of rushing right over to the studio to wreck my painting! So I used the photo of the latest version of the portrait (which was day 3) and opened it in Painter IX. Before I got to work, I also opened the reference photo and put a grid over each image, and looked at them side by side. Then I used digital pastel to change the relative position of the eyes and eyebrows. I also changed the line of the hair to indicate a bit of the head tilt. Then I added some shadows around the nose and mouth. I was much happier because I began to be able to recognize myself a little bit in the portrait. Now I knew what to do next, and would just have to make the same changes in oil bar on canvas. That might sound easy, but I am still struggling to control the oil bars. In fact, it is much easier and faster for me to make the changes in digital pastel, even though I am "drawing" with the mouse. Anyway, I was glad I took the time to work out the changes on the computer. I printed out a two copies of this image to take to the studio on Monday; I annotated one copy, drawing lines and making notes so I would remember what I had changed. To be continued. . . .

Sunday, February 03, 2008

Self-Portrait With Self-Portrait (Oil Bar Painting Day 3)

Self-Portrait With Self-Portrait (Oil Bar Painting Day 3)

This is my self-portrait in progress, as it looked after I finished painting on Friday, which was the third session. The day before had not gone well, and I was anxious to get to the studio and try to get the portrait back on track. That morning, I had used Painter to do a digital overlay over the previous day's work. (See yesterday's post.) I printed it out and took it along to the studio to use as a reference. When I got to the studio, as planned, I changed the hairline, and moved and repainted the eye on the left side of the canvas. Yes, it was the position of the features that had created the problem, and I was a lot happier once I had made the changes. I still have more changes to make, and this is still not what I would consider a likeness, but I was relieved and felt that the painting was back on track. I am going to move features around some more, and I am not really worrying about color yet, so the skin tone is still yellow, and the eyes are not even the same color! As I was working on repainting the eye, I noticed that I was getting a lot of purple/red tones, and I remembered that when I was a little girl, my mother used to say that I had bing cherry eyes. (At the time, I had no idea what a lucky little girl I was to have a mother who would say things like that. )

Saturday, February 02, 2008

Self-Portrait With Self-Portrait 2 With Digital Overlay

Self-Portrait With Self-Portrait 2 With Digital Overlay (Originally uploaded by randubnick)

I got up early Friday morning, thinking about how to get my self-portrait back on track. (It had derailed the day before.) I thought I knew what was bothering me about it, and was anxious to get to the studio and fix it. But I decided to try out my ideas first with a digital overlay. So I opened the photo of the portrait from the preceeding day, saved the file, and opened it in Painter. Then I drew over it using digital pastel. I was right! The day before, as I painted, I had slowly shifted the placement of the features. The result was that the eyes were too far apart, and the forehead was too short. So I used digital pastel to draw changes in to correct those problems, and this image is the result. I was relieved, because although this is still not a likeness, it is a lot better than the previous day's version. I printed this image out, and took it to the studio to use as a reference when I made similar changes in paint on canvas. To be continued. . . .

Friday, February 01, 2008

Self-Portrait With Self-Portrait (Oil Bar Painting Day 2)

Self-Portrait With Self-Portrait (Oil Bar Painting Day 2) Originally uploaded by randubnick

Yesterday I went back to the studio to work on this self-portrait. This is how it looked when it was time to pack up and go home. I was NOT happy with it at that point because I felt I was already losing the likeness, but I was out of time and had to stop for the day. I had started the session by working on the mouth, and in fact I was happy with that. Then I had started working on the eyes, but something was off and I didn't know why. Although I didn't have a likeness, I was getting a family resemblance. Well, this has happened to me before while doing a portrait. When I am painting someone I know, sometimes I get a general family resemblance before I get a likeness, so I recognize the person's mother or the person's son. That just means I am on the right track. But the experience can be a lot more powerful in a self-portrait and it can be unsettling to "recognize" your relatives (alive and not) when you look at yourself. I think I made changes in response to that feeling, rather than to observation of my reference photo. The result is that this image doesn't really look like me, but it does look like some of my relatives. Well, that is how it goes sometimes. Although I was frustrated when I left the studio, I was pretty sure I would be able to get the painting back on track. Once I got home and could see the image on the computer, I realized that the placement of the features was off. I thought I knew what to do about it, so I tried out my idea with a digital overlay. But that is tomorrow's post. To be continued. . . .